


Panocont Stand Alone Panorama Controller for Merlin Mounts
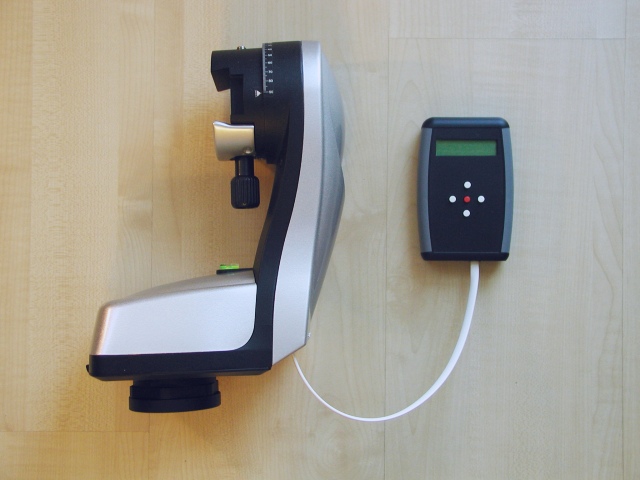
This hand-held controller (handset) can be directly connected to a Merlin mount and let you taking panoramic photos easily. You won´t need any computer or smartphone, just simply plug into your Merlin, turn it on, set up the mosaic image data and enjoy that the device does the hard work for you automatically.
The Panocont device allows you to create the following:
- Full spherical panoramas
- Panoramic image of any desired resolution
- Panoramic Strip (horizontal or vertical)
Settings:
- CCD size (full frame, 1.3x, 1.6x, 2x crop)
- Focal length of objective lens
- Overlap between pictures
- Reference Point (the current position of the middle, upper left, lower left corner of the panorama image according to your choice)
How to use it:
Connect the device to the Merlin mount (instead of its original hand control unit), then turn on the Merlin mount. The handset doesn´t require separate power supply as it gets the power from the mount.
After turning on the device the version number of the device shows up briefly then after a short time, the firmware version of the Merlin mount appears.
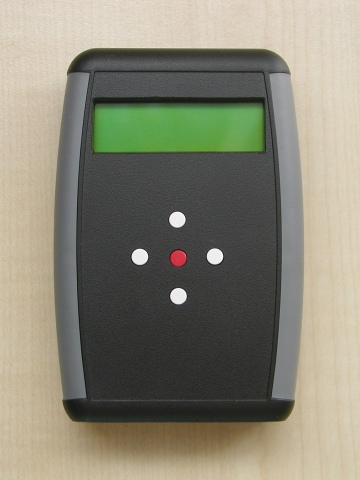
At this point the device is in "manual mode". In this state, we can move the head with the help of the four direction buttons (white buttons) and adjust the speed by pressing the central red button.
With a long press on the middle button (2 seconds) we get into "Menu Mode" where we can access various settings and to start the panoramic program.
We can navigate between the individual menu items by the right and left buttons and then we can change the individual menu settings by pressing the up and down buttons.
We can get back to "manual mode" by a long press on the central button again.
Operation of the panorama program
To start the taking of panorama images, you should start it from the menu. The Panocont does the entirelly process automaticallay, depending on the settings previously made.
During the process you see something similra on the LCD display: "H:4 V:6 [M]" The H means the horizontal position and V menas vertical position. (Now 4 and 6 are just examples.) The "M" in the brackets means the status. It can be one of these:
- M: Movement between positions
- W: Wait before and after exposition
- X: Exposition of image
The panorama process can be stopped but the actual step will be finished before the program stops.
Description of Menu Functions
The Panocont menu has the following menu items:
- Type of panorama
- You can choose between these modes: Full sphere, half sphere, rectangular area with automatic image calculation, rectangular area with fixed number of images, horizontal and vertical strip.
- Reference point
-
you have two choices:
- Center: The position where the camera looks just before start the panorama program, will be the center of the area.
- Any corner: The position where the camera looks just before start the panorama program, will be one of the four corner of the area.
- Setting the end point
- For specify the area of the full panorama, at least two point should be given for the panocont. One is the reference point and one is the end point. Important: You should always set the end point first, then move the head to the reference point.
- Number of images horizontally
- Specify how many pictures should be in the resulting panorama image in horizontal direction.
- Number of images vertically
- Same as above but in vertical direction.
- Size of the CCD sensor of the camera
- You can choose the size of the imaging sensor from a list.
- Focal length of objective lens
- The focal length of the objective lens can be choosen from a list from 13mm - 1200mm range. This setting is relevant only when the number of images will be automatically calculated by the Panocont.
- Overlap between images
Examples of usage
Panocont provides more ways to make panoramic images. In the following examples we provide an overwiev about them.
Example 1: Making rectangular panorama image with fixed number of images
In the following example we should make a rectangular panoramic photo consists of 8 x 4 images. In this case we specify the exact number of images. The full area of the panorama will be given by two corner points.
- Connect the panocont to the Merlin Mount's hand controller socket, when it is switched off. (Original Hand controller is not needed.) Switch on the Merlin. A greeting message will be displayed on the Panocont's display, then the message changes to "Connected".
- Push the center button for at least two seconds to go into the menu.
- In the menu you can anvigate between menu items by pressing the right and left buttons. go to the "Panorama type" menu. In the menu you can choose between options by pressing up and down buttons. Choose "fixed X-Y". This option lets you manually specify the number of images taken for the rectangular panorama.
- Go into the "No. of images horiz" menu. (Push the right button, it is the next menuitem after the "Panorama type") With the up and down buttons, choose 8.
- Go into the "No. of images vert" menu. With the up and down buttons, choose 4.
- Press the cebnter button for two seconds, to exit from menu. Now you get into "manual mode". In manual mode you can move the head with the direction buttons.
- Move the head into one of the corners of the desirec panorama area. In the example: upper left
- Push the center button for at least two seconds to go into again the menu.
- By the right and left buttons, locate the "Set end pos" menu. Press the up button, and the position will be stored.
- Leave the menu and go to the manual mode again by pressing the center button for 2 seconds.
- Move the head by the direction buttons to the desired reference point. It should be the diagonally opposite corner. In the example: lower righ position.
- Go into the menu again (Press center button for 2 seconds.)
- Navigate to the "Start panorama" in the menu.
- Press the "Up" button to start of the panorama program.
Example 2: Making rectangular panorama image with automatically calculated number of images
In the previous example we made a panoramic image by manually specifying the number of images. In such case you should consider the objective focal length, the ccd size and the desired overlap between the individual images. It could be difficult.
The Panocont can do this calculation automatically. In such case you should specify the following parameters: the CCD size, focal length of the objective lens and the desired overlap between images. Panocont will calculate the number of the required images.
To use this automatic calculation, we should use "Auto diagonal pt." mode from the Panorama type menu. This mode means: Create a rectangular panorama picture, by defining the area with corner points or center of the area and one corner, and let the Panocont automatically count the number of images.
In the example we use these settings:
- Camera: ASP-C sized image sensor (eg the popular Canon EOS 500D)
- Lens: 70mm focal length telephoto lens
- Overlap: 20% between images
On the basis of these parameters Panocont can calculate how many pictures needed to cover the desired area. Here's the process how to make a panoramic image in this way:
- Connect the Panocont to the Merlin and turn it on. Wait until the "Connected" message is displayed.
- Long press the middle button to enter the menu.
- Look the "Panorama type" menu. By pressing the up-down buttons, select the "Auto diagonal pt." Option. This means auto Image division. The whole area is specified by two diagonal corner points.
- Right, you walk to go to the "CCD sensor size" menu. Here, the size of the image sensor are given. The up and down buttons to select the "APS-C (1.6x Crop)" option.
- Right, you walk to go to the "Obj. Focal length" menu. You choose the focus of the lens. The up and down buttons to select the value of 70mm.
Third example: horizontal panoramic strip
In this example, a horizontal strip panoramic image is created. The individual images fit in a row in a side by side, with a small overlap between them.
In this example we specify the area by the center and one end. (Specyfying with two ends also possible.) First, select the end point and then the reference point (middle of the strip).
Appendix 1: Image Sensor Sizes
The Panocont is compatible with the following type of CCD sensors.
| Type | Image crop | Diagonal (mm) | Width (mm) | Height (mm) | Example |
|---|---|---|---|---|---|
| Full frame | 1x | 43.3 | 36 | 24 |
|
| APS-H | 1.3x | 33.5 | 27.9 | 18.6 |
|
| APS-C | 1.6x | 26.8 | 22.3 | 14.9 |
|
| 4/3" Type | 2x | 22.5 | 18 | 13.5 |
|
| 1" Type | 16 | 12.8 | 9.6 | ||
| 2/3" Type | 11 | 8.8 | 6.6 | ||
| 1/1.7" Type | 9.5 | 7.6 | 5.7 |
|
|
| 1/1.8" Type | 8.9 | 7.2 | 5.3 | ||
| 1/2" Type | 8 | 6.4 | 4.8 | ||
| 1/2.3" Type | 7.7 | 6.2 | 4.6 |
|
|
| 1/2.5" Type | 7.2 | 5.8 | 4.3 | ||
| 1/2.7" Type | 6.7 | 5.4 | 4 | ||
| 1/3" Type | 6 | 4.8 | 3.6 | ||
| 1/3.2" Type | 5.7 | 4.5 | 3.4 | ||
| 1/3.6" Type | 5 | 4 | 3 |