


Ursa Minor Autoguider interfcae
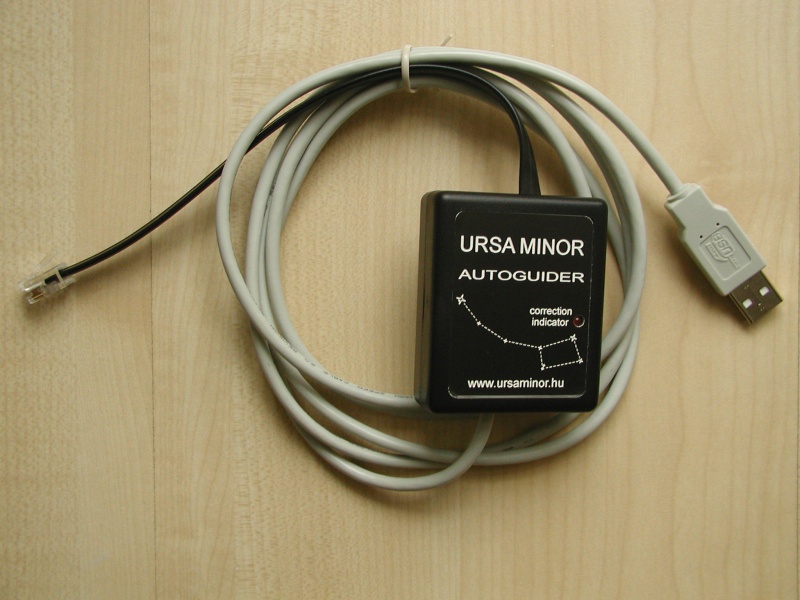
USB autoguider interface. Whit this device you can make a connection between your computer and the telescope mount. The mount should have ST4 compatible autoguider port. With a freeware autoguider program, the mount can be directed by guiding pulses.
What kind of mounts can I use with this?
This USB autoguider is compatible with all mounts having standard ST4 autoguider port. Here is a list with some popular examples:
- EQ6 Pro
- EQ6 Syntrek
- HEQ5 Pro
- HEQ5 Syntrek
- EQ5 Goto
- Old Eq5 upgraded with Synscan goto kit.
- EQ3 Goto
- Old Eq3 upgraded with Synscan goto kit.
- Celestron CAM goto (Celestron Advanced Mount)
Of course a lot of other mounts can also be used. Those were just examples.
How does it work?
For long exposure astrophotography it is essential to use guiding. Without guiding you cannot use longer exposure than some seconds because polar adjustment errors, and mechanical errors will cause drift in images.
To avoid trailing of the image, We should use a separate guidescope on the same telescope mount, and let the computer watch a guide star in the field of guiding camera. The computer should keep the guiding star centered by sending correction impulses to the mount when the guiding star moves out of its original position.
The Ursa Minor Autogider makes a connection between the computer and the telescope mount.
What do I need?
In addition to the Autoguider Interface itself you will need these accessories too:
- Telescope mount that can hold two telescopes
- Guiding scope
- Autoguide software
- Guiding camera (High sensitive webcamera (for example, Philips SPC900NC) can be a good choice.)
- Infrared blocking filter
- Eyepiece adapter for the camera
Some astronomical cameras have IR block filter and eyepiece mount adapter already installed.
Tip: The Philips SPC900NC webcam is an excellent choice as guiding camera.
- This webcam has high quality CCD sensor with low noise level. For guiding, it does not need an IR blocking
filter. You can save the price of the filter.

- If you use Windows Vista, you may need to download the driver for the webcam.
- This camera can be used for guiding directly out-of the box. Modification for long exposure mode is not needed.
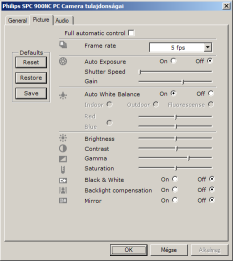
use the lowest frame rate (5 fps can be selected), and use image stacking feature of the autoguider program.
GuideMaster can do stacking! This image shows the suggested settings for guiding:

How can I buy the autoguider interface?
The autoguider can be purchased from our distributors. Here is a link:
- Price of the autoguider and ordering infos at the homepage of our distributor in Austria
- Price and ordering infos at the homepage of our distributor in the U.K.
How can I use?
Preparations
Before using the autoguider, you need to install the driver for USB communication. The autoguider based on the FTDI chip. The detailed description of installation of the FTDI driver can be read from FTDI's homepage. If you do not like to read all that documentation, here is the basic steps of installation:
There are two modes of driver installation: Automatic and manual.
Automatic installation of the driver
You can obtain the driver by downloading this zip file: FTDI_automatic_driver.zip, or you can download it from the homepage of the manufacturer: http://www.ftdichip.com/Drivers/CDM/CDM%202.04.06.exe
This program will automatically install the driver. When the installation finished, zou can connect the autoguider to a free USB port.
Manual installation of the driver
You can obtain the driver from the CD disc or you can download it from the Internet. The driver can be downloaded from the homepage of the manufacturer.
- To start installing the driver, connect the autoguider into a free USB port. The computer will recognize it, and starts searching a driver for it.
- the "New hardware wizard" window will appear, asking the place of the driver. Please chhose the "Install from specific location (Advanced)" option. A new window will appear asking search options. Please check the "Include this path for searching" option and press "Browse".
- A new dialog box will appear, and you should navigate to the folder of the driver. Press "Ok" or "Open" and the driver will be copied and installed.
- Now you should restart the computer.
- After restarting, the computer will recognize the autoguider and the driver.
Checking the COM port number
After the autoguider connected, the computer will assign a com port number (COM1, COM2...) to it. You should need to know this com port number, because it is needed for use with autoguider programs. The port number can be seen from the Control panel. The method is similar as using USB-serial converter. You can read how to check the com port number on the support page.
Using with GuideMaster
GuideMaster supports this autoguider directly, therefore yo don't have to use ASCOM drivers.
The autoguider uses Meade LX200 commands, so you should choose LX200 as telescope type.
- Start the GuideMaster program
- Choose General/Setup from main menu. The settings window will appear.
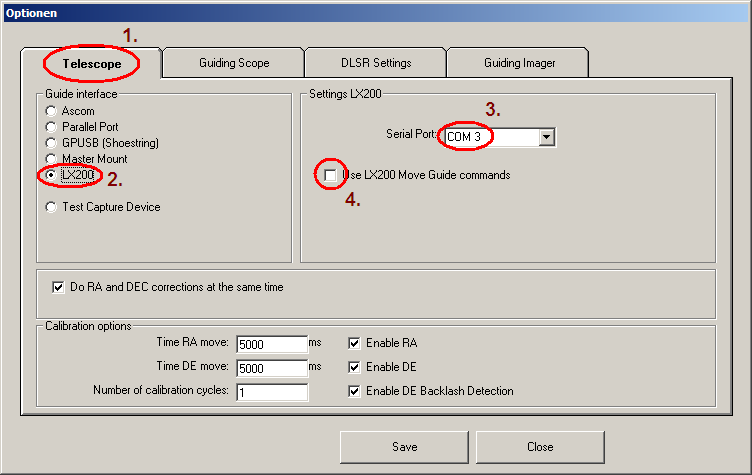
- Choose first tab page. This page contains settings regarding to communication with telescope and autoguider.
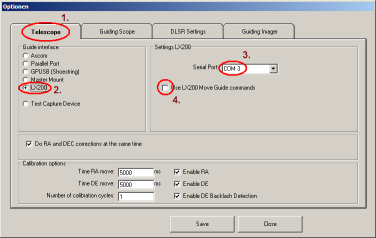
- Choose "LX200" from the options. Choose proper COM port from the drop-down list of ports.
- The "Use moveguide commands" should be unchecked.
- Please click Save button.
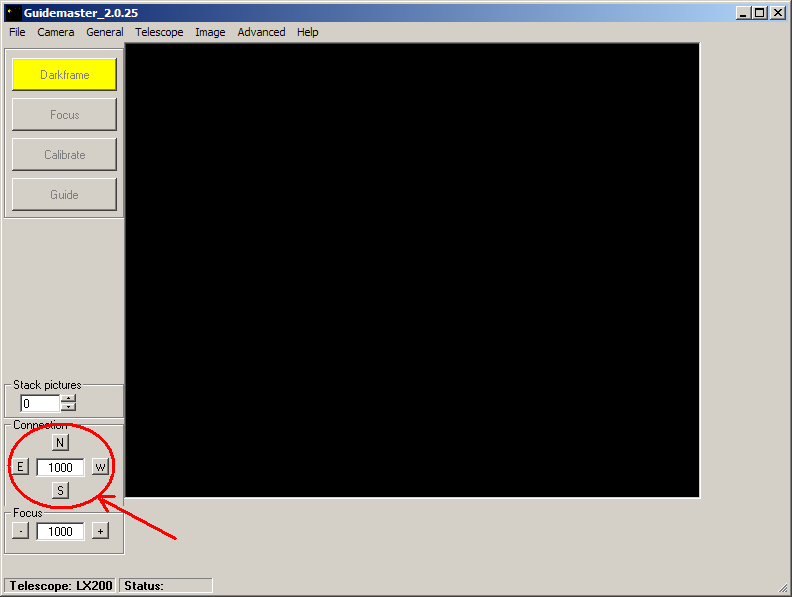
- In the main menu choose "Connect". if you don't receive an error message, the communication is
established. Four direction buttons will appear in the lower left corner of the window, as shown in this image:

- You can check the operation of the autoguider by clicking these direction buttons. As you push one, the program will send correction command, and the red LED blinks on the Autoguider.
Using with PHD Guiding
When you would like to use PHD Guiding program, please download and install the "Generic LX-200 (5.0.1)" ASCOM driver.