Hand controller for MC5 and MC3 Telescope Controls
Introduction
This hand controller is designed specially for the MC5 and MC3 telescope controllers.
With this device you can directly use the MC5 or MC3. This little device contains an astronomical database covering several thousands of celestial objects. These objects include: stars, double stars, variable stars, star clusters, nebulae, galaxies.

Upgrade the firmware
- You can find the official firmwares on this page.
- The beta firmwares can be found on this page.
The firmware upload process is similar than the MC3. Few useful notes:
- You need only single USB connection between the hand control and the computer.
- No other cables should be connected.
- On the hand controllers display the following message will appear in few seconds: "Cannot connect to mc...". You should ignore this.
Controls and connections
The following figure shows the major components and connections of the hand control.
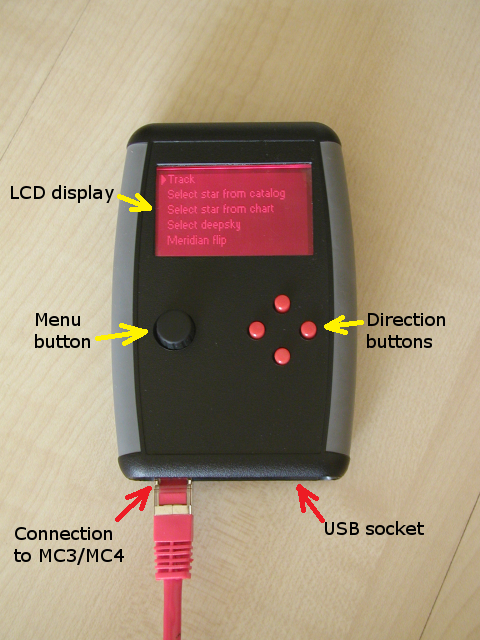
- LCD display
- LCD display with 128 x 64 pixel resolution. It has red backlight with adjustable brightness.
- Menu button
- Pressing the button for longer period (2 seconds), enters to and exit from the menu. The key can be rotated arbitrarily. In one turn it clicks 24 times. This allows entering for different values, such as the date, the motor speed and the catalog number of selected astronomical objects.
- Direction buttons
- Main purpose of them is movement of the telscope. These buttons are also used for navigating in the menu structure.
- Connection to MC3
- The hand control should be connected to an MC3 or MC4 unit through this connector.
- USB connection
- The hand control can be connected to a computer with an USB cable. This allows the update the firmware and the internal database.
Basic usage
This hand controller designed exclusively for the Ursa Minor MC3 Telescope controller. To connect it to the MC3 control unit, you need a cable with RJ45 connectors at the both end. A computer network patch cable is aplicable.
- Connect the hand control to the MC3, when the power is off.
- Turn on the MC3-controller and watch the display of the Hand control.

- After a few seconds, the hand control connects to the MC3 and writes the firmware version numbers onto the screen.
- Press any button to step into "Home screen".
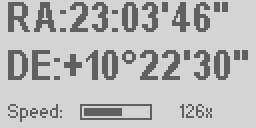
The home screen is the default mode of operation: You can move the telescope with the direction buttons. The speed of the movement is indicated by a slider at the bottom of the screen. The speed can be adjusted by rotating the menu button. Note: This speed adjustment is related to the manual movement only. The speed of the goto movement can be set in the settings menu.
- Pressing the menu button longer for 2 seconds lets you go to the main menu. If you press the menu button for 2
seconds again, it exits from the menu.
You can navigate in the menu by rotating the menu button or by pressing the up and down buttons. The menu command can be selected by simply pressing the menu button for short time.
PC Connection
The handheld controller equipped with a USB port, your computer can be connected through. This might be interesting in the following cases:
- Update astronomical catalogs
- The hand-held controller has built-in 8 MB internal memory, in which a variety of catalogs, or observation lists can be loaded.
- Firmware Update
- The internal control program (firmware) can be updated manually by a freely downloadable program. The same program is suitable for MC3 and the Hand Controller's firmware upload. The program recognizes which device is connected to a computer and allows uploading only the compatible firmware.
Steps of the firmware upgrade
- Connect the Hand control to the computer via an USB port. No other connection necessary.
- The Hand control start to operate, but it cannot connect to the MC3: The "cannot connect" error message will appear on its display. It is not a problem now.
- In your computer, discover the COM port number assigned to the Hand Control.
- Start the Firmware uploader program and follow the instructions similarly as the MC3 firmware update.
Default positions
Background information: The default positions of the german equatorial mount. This information will be used later, by the initial orientation and setup of the system.
The Ursa Minor system knows the six following default positions. You can easily adjust your telescope just by a single click, after you set up your telescope any of the following position. Obviously you can define any position as the park position for your system. The predefined default positions just help you for the initial setup.
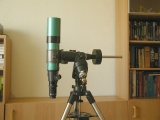
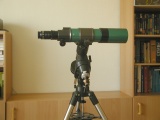
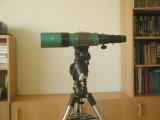
All above images were taken as we see the mount from south.
East side - Equator
The scope is at the eastern side of the mount and looks to the Equator. The counterweight shaft is horizontal and points to the West.

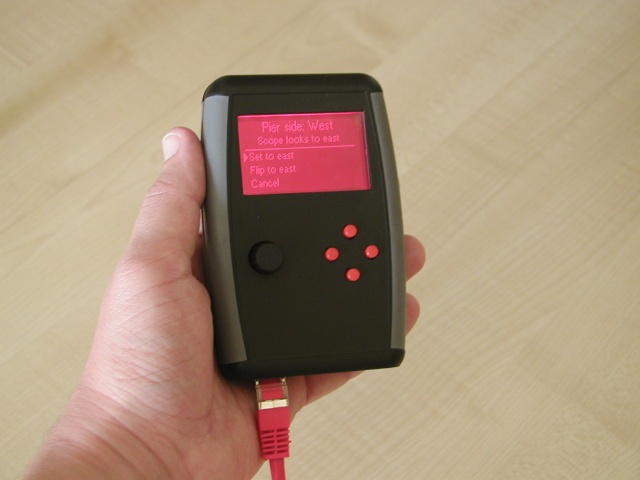
West side - Equator
The scope is at the western side of the mount and looks to the Equator. The counterweight shaft is horizontal and points to the East.
East side - Zenith
The scope is at the eastern side of the mount and looks to the Zenith. The counterweight shaft is horizontal and points to the West.
West side - Zenith
The scope is at the western side of the mount and looks to the Zenith. The counterweight shaft is horizontal and points to the East.
East Horizon
The scope looks to the eastern horizon. The counterweight shaft is points to the ground.
West Horizon
The scope looks to the western horizon. The counterweight shaft is points to the ground.
Initial setup of the MC3 with the Hand Control.
This chapter describes, how to set up the MC3 at the first time without using a computer at all. In order to properly using a telescope mount, at least the following settings must be set or checked:
- Gear ratio
- Direction of motor rotations (Reverse the motor rotation if needed)
- Max speeds
- Park position
Checking the rotation directions of the motors
Using a german equatorial mount, you should pay an extra attention to the declination motor: Its rotation will reverse as you make a Meridian Flip. The Hand control automatically reverses the declination motor during a Meridian flip. However, at the initial setup yo should check it with the following steps:- Switch on the MC3, and move the telescope to any of the predefined default positions. (You can do this with motors, or by hand by loose the clutch.) At this point, do not worry about the default rotations of the motors. It is not a problem if one or both motors are running in reverse direction now. We will correct it a few steps later.
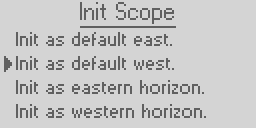
- Go into the "Init scope" menu, and choose the menu item related to the telescope's position.
- Now the controller knows the position of the telescope.
- Push the right button and check the rotation of the RA axis. The telescope should go to west. If it is not so, the
RA direction should be reversed:
- Press the menu button for longer period, to go into the menu.
- Navigate to the "Mount settings" submenu and choose it.
- Navigate by the left and right buttons, until you find the "Motor rotations" page.
- Here you can reverse any motors, and even the autoguideing directions if needed.
- Press the menu button for longer period, to go back to the home screen, and continue with the DE motor.
- Press the up button, and the telescope should go to north. If it is not so, the DE direction should be reversed similarly as the RA motor.
Save the settings
Important: After you finished with the settings, you should save the parameters inside the MC3, as it can work with the new settings at the next use.
Using the MC3 with the Hand Control
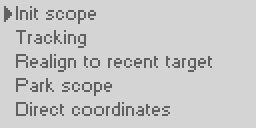
The Init Scope menu
This menu serves to initialize the system. Normally, the system initializes itself as the scope is in the park position. (Also, it was parked properly at the end of the last observing session.) In such case, you do not need to init the scope again with this menu.
This menu is more useful in mobile astronomy configurations, after you assemble the telescope mount in the field. In mobile setup the park position is not used, because the mount can be in any position after you assemble it. In such case you may initialize it from one of the predefined positions.
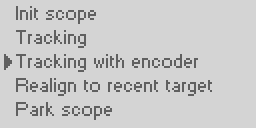
The Tracking menu
In this menu you can switch on or off the tracking, and you can choose between three possible track rates: Sidereal, Solar, Lunar.
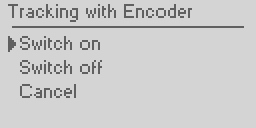
Tracking with high resolution encoder
If your mount is equipped with high resolution absolute encoder on the Ra axis, the MC5 controller can use it to provide precise guider-less sidereal tracking. The controller keeps the periodic error within +/- 1 arcseonds (typically better than +/- 0.5 arcsecond). The encoder based tracking (closed loop control) can be switched on and off from the menu. The option is available in the menu only when the connected motor controller supports it.
Initial adjustment the telescope to a reference object
By this function we synchronize the position known by the controller with the actual position of the telescope by pointing to a known reference object. This function is more important in mobile astronomy, but may also useful in fixed observatories too.
Choose a bright star for a reference object, and move the telescope to this target. Please pay attention to the pier side! The reference object should be on the same side, also it should be accessible without doing Meridian flip.
After you moved the scope to the reference star, you should search it in the database of the Hand control. The easiest way is using the graphical constellation map function.
- Go into the menu by pressing the menu button for at least 2 seconds.
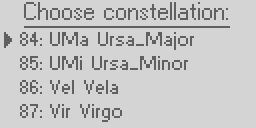
- Navigate to the "Select star from chart" menu item and choose it.
- The list of the constellations will be displayed. Choose the constellation which contains the reference star.
- The simplified chart of the constellation will be displayed. One star is highlighted by a small circle symbol. This
selection can be moved to star by star by rotating the menu button. Choose the reference star and press the menu
button.

- The information page of the selected star will be displayed showing the star's name, identifier and the brightness.
At the bottom of the screen you have three options: Cancel, Goto, Set.
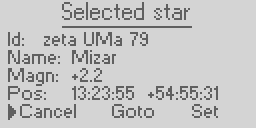
- Choose the "Set" option and activate it by pressing the menu button. It synchronizes your telescope to this target.
Positioning the telescope to an object with known coordinates
If you do not find the desired object in the Hand Controller's database, but you know its coordinates, you can enter the values and direct the telescope to its exact position.
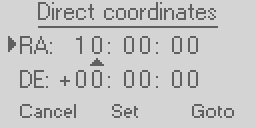
This feature is useful for minor planets and comets.
Using the Hand Control's internal astronomical database
Searching bright stars
- Go into the menu, and choose the "Search star from catalog". As you see, there are many alternatives as shown in
the following image:

- Choose a "Bright star" option, and the list of the constellation displayed:
- Choose the constellation which contains the searched star, and the following page displayed:
You can search by Bayer (greek letter) or Flamsteed (nember) identifier. If you are searching a star with Flamsteed identifier, please keep the Bayer field empty. If you are searching a star with a Bayer identifier, choose the greek letter. In this case the Flamsteed number will be ignored during the search. Navigate to the "Search" command and press the menu button.

- The data page of the star will be displayed as follows:
Searching named stars
This function useful when you know the name of the star. In most of the cases you do not have to give the full name. The few first characters are enough fo most of the case.

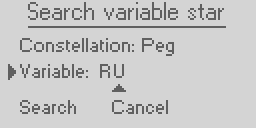
Searching variable stars
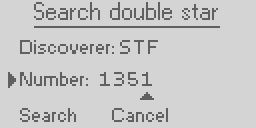
Searching double tars