


Product support
Beta versions of the programs
You can find these on separate page.
Ascom Driver for MC3 and OC5
Using the simple roof Ascom driver
Using USNO-A2 catalogue
Because the Usno-A2 catalogue is too large the installer doesn't copy it automatically to the hard disk. It should be installed manually:
With the Ursa Minor installer disc you also get two additional discs containing USNO-A2 data files. In order to use
this catalog you should copy USNO data files from these discs into Ursa Minor's data directory. The target directory is:
c:\Program Files\Ursa Minor Pro\data\usnoa2
This directory may be different depending on which version of Windows and which version of Ursa Minor software you use.
Please copy all files with *.cat extension from USNO-A2 discs into this directory.
After starting Ursa Minor it will use USNO-A2 data automatically. As you increase zoom, you can see the magnitude limit in the status bar. Please zoom to high power, until the magnitude limit reaches 16 (or more), and stars will appear from USNO catalog. By choosing Help / Info menu, a small info box appears showing magnitude limits for each type of object, and star catalog currently in use.
Controlling HEQ5 pro / EQ6 through hand controller
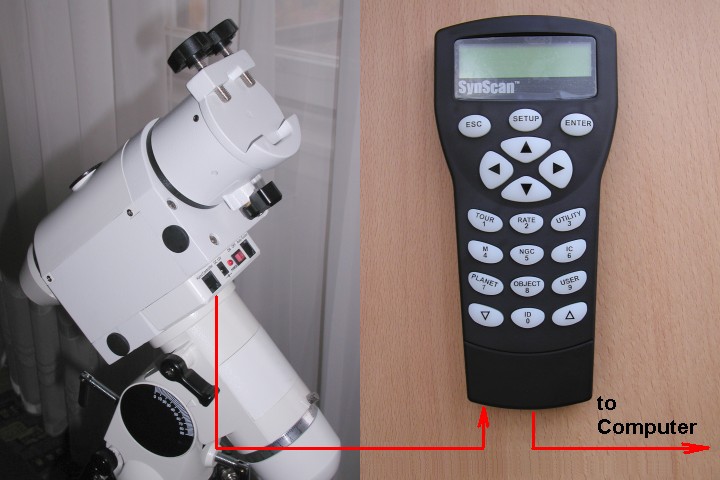
The Synscan hand controller has a serial (RS-232) port and can be connected to a computer through this connection. Choose "Nexstar-1" protocol in Ursa Minor. After the connection is established you can direct the telescope to any selected object. In this case you can use only basic functions (positioning and retrieving current position).
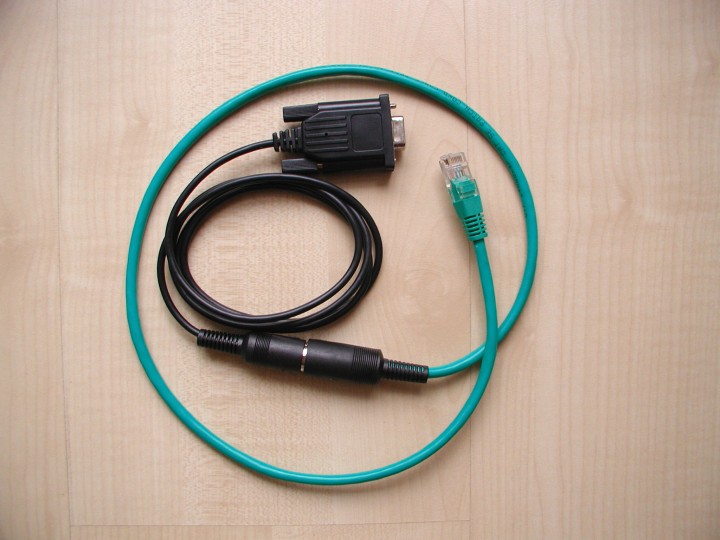
Controlling HEQ5 Pro/EQ6 Pro Mounts without Hand Controller
Ursa Minor can control these mounts without using the Synscan hand controller. In this case the connection will be established directly between the mount and the computer by a special cable containing the necessary interface circuitry. With Ursa Minor software you can direct the scope control movement speeds, switch on or off guiding and park the scope. This picture shows the interface cable:
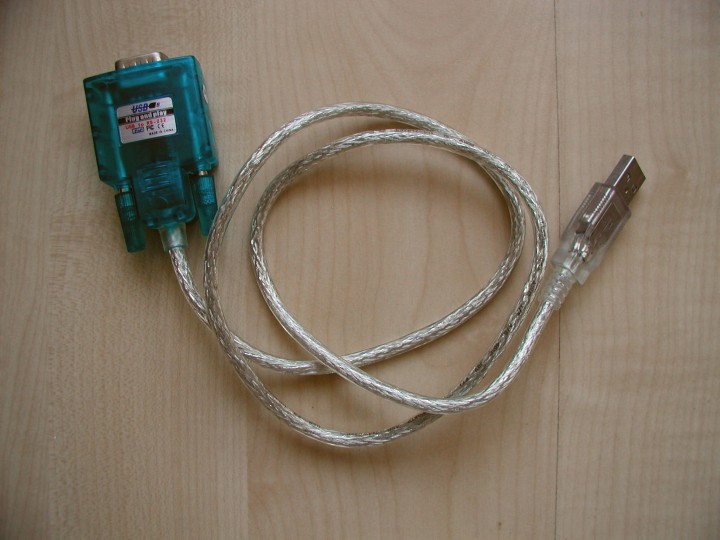
Using USB to serial adapter
When you do not have a serial port on your computer, use an "USB to serial" adapter. Below is a short introduction on how to deal with it.
Note: This information is not specific to the Ursa Minor program. Any program communicating over a serial port may require these steps. This procedure may also be necessary when you update the firmware of the Synscan hand controller.
However it is a USB device. From Ursa Minor's point of view it looks like a normal serial port. Every serial port (COM port) has a unique identifier such as COM1, COM2, COM3, etc... When your computer has a real serial port, usually it is the "COM1" port.
When you establish a connection between Ursa Minor and the telescope you need to know the number of the COM port. In the connection window you first select type of the mount from a drop-down list and a port identifier from the second drop-down list. You must identify which COM port number was assigned to the USB-serial adapter.
The assignment of COM port numbers are configured by Windows automatically and are typically not assigned contiguously. This means that the USB-Serial converter may be assigned (for example) "COM8".
Installing USB to serial adapter
- Please connect the USB-serial adapter into one free USB port.
- Windows will automatically detect it.
- Please install the driver. (Fom the CD disc of the adapter cable)
- Now you should restart the computer. (It is necessary to loading new driver)
Installing the driver for the USB-Serial converter
You should download the driver from the manufacturer's homepage: www.ftdichip.com
- Click on the third item "Drivers" in the left side menu, then the fourth item: "VCP Drivers"
- Choose this from the table: CDM_20v2.10.00_WHQL_Certified.zip There are different versions for 32 and 64 bit windows.
After the driver installed (maybe a restart required), plug in the MC3, switch it on, and after a few seconds (maybe minutes) the operating system should recognise as an USB serial converter, and it should appear in the Device Manager.
Discovering the COM number of the USB to serial converter
The COM port number is allocated by Windows when you connect the MC3 to the computer via USB cable. This com number can be anything between COM1 and COM255. It can be checked by opening the Control panel on Windows.
Using Windows 7
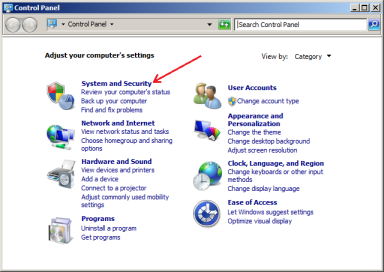
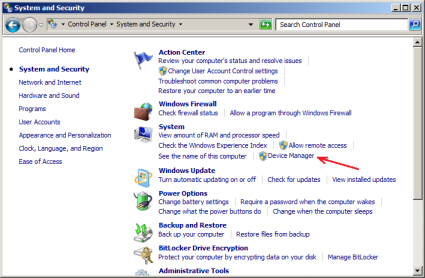
- Open the "Control Panel" from the Start menu and click on the "System and Security" item:
-
- On the "System and Security" page, click on the "Device Manager" item:
-
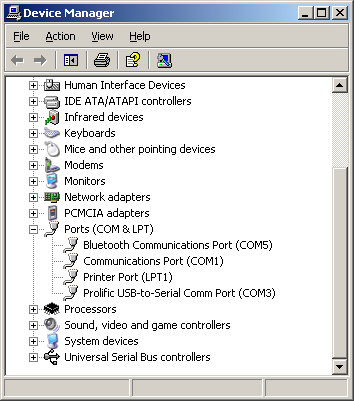
- The "Device Manager" window will appear. In the window the system components will be listed.
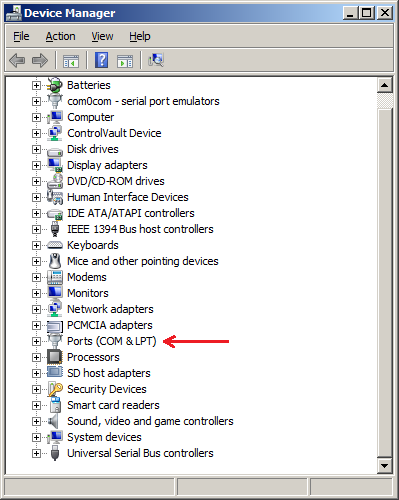
- Locate the "Ports (COM & LPT)" in the list, and expand it by clicking on the small "+" icon.
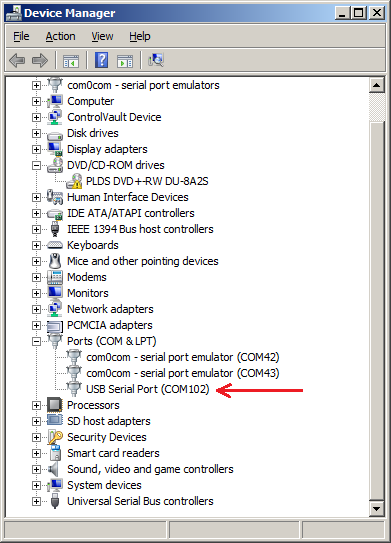
- The list will be opened, and all of the installed COM and LPT ports will be listed. Search something like "USB
Serial Port" or "USB to serial converter" or "Future Devices international". The COM port assigned to them is the port
number you search.


Note: When the device driver of the USB-Serial Converter is not installed properly, the system will not recognize the device. In such case, the Com Port entry will be missing from the list of the device Manager. If there are no other COM ports in the system, the entire "Ports (COM & LPT)" group will be missing.
Using Windows XP
- Please open "Control panel" from the Start menu.
- Select "System" icon, and a new popup window will appear.
- Select the "Hardware" tab and the the "Device manager" button in this window.
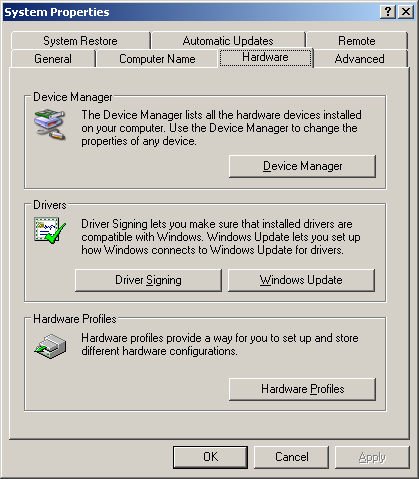
- A list window will appear, showing harware devices. In the list please search the "Ports (COM & LPT)" menu item
as shown below.
- Open this item by clicking "+" sign.
- A sub-list will open, showing installed ports.
- This list may contain more devices amongst the USB-serial adapter. For example, modems, bluetooth and irda devices may appear.
- Select the "USB to serial adapter" from the list. The name of the device may be different depending on the manufacturer.
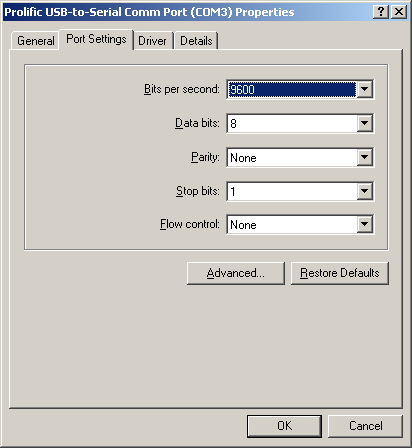
- Next to the name directly is displayed the COM port number. Use this value in Ursa Minor program.
Use this port number when you open a connection with Ursa Minor.
Important: This COM number may change when you plug the USB-serial adapter into a different USB socket. Therefore please re-check the assigned COM port after you disconnect and reconnect a USB cable.
Change the COM port number
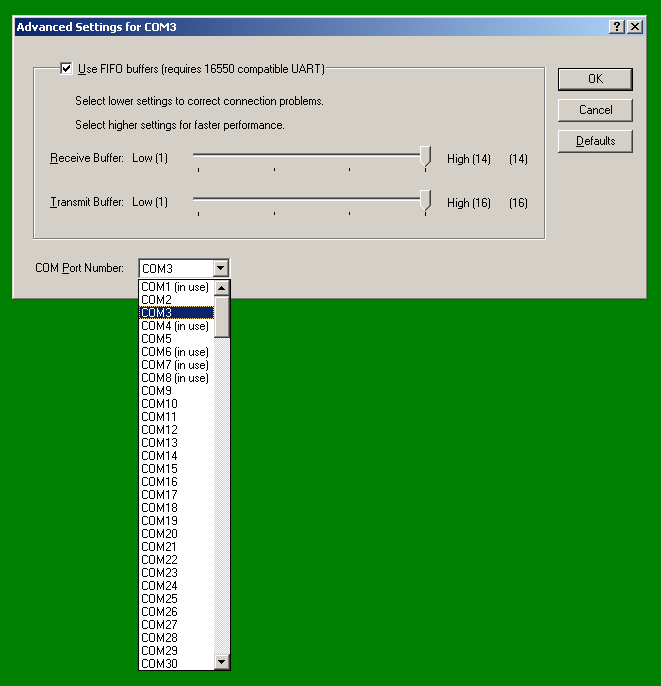
Sometimes it can occur, that the assigned COM number is greater than 16. Some programs needs a port number in COM1 ... COM16 range. (Ursa Minor program can operate with COM ports in the entire COM1...COM255 range.) In this case you should reassign the port number in the Device manager window:
- Please right click on "USB to serial adapter" and choose "Properties" from the menu.
- A new window appears. Click the "Advanced" button.
- A new window appears. On the bottom left corner of this window you can assign a new COM port number.
Installing virtual serial port pair
This freeware driver emulates a port pair and ties them together. One program can connect to the first port of the pair and other program connects to the other port. All data sent by the first program will be received by the other program and vice versa.
This virtual com port pair can be used to make connection between Ursa Minor and an autoguider program. Please follow the steps to install the driver:
- Download the driver.
- You can obtain a copy from there: com0com-2.1.0.0-i386-chk.zip
- Or you can check the homepage of the project: http://com0com.sourceforge.net/
- Install the driver. You should read the readme.txt file. All necessary steps are discussed in this file.
- After the installation is finished, start the configuration tool of the virtual serial port driver from the Start menu. Choose "com0com / Setup" from the start menu.
- A window will appear. On te top of the window in small textfields, we can see the identifier of the virtual ports.
By default, here we can read "CNCA" and "CNCB". We should rename them to COMx and COMy, where x and y are numbers. At
least one com port number should be in COM1-COM16 range before some autoguider programs and ASCOM drivers need this.
In our example we use COM5 an COM6. You can check free com port numbers in the Control panel. (As described in the section: using USB to serial converter)
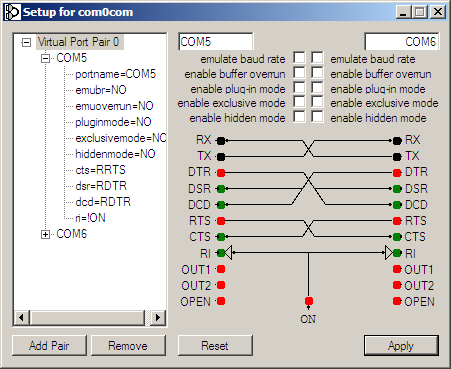
- click the "Apply" button, and the virtual serial port is ready to use.